If you’re looking for a show-stopping treat that’s as fun to eat as it is delicious, this Chocolate Covered Caramel Apple Slices Recipe will quickly become your new favorite. Crisp apple slices coated in rich, velvety chocolate and silky caramel, then topped with a delightful sprinkle of your favorite toppings, make each bite a perfect balance of sweet and tart. Whether you’re gearing up for a festive party or just craving a comforting snack, these chocolate covered caramel apple slices bring pure joy in every bite.
Ingredients You’ll Need
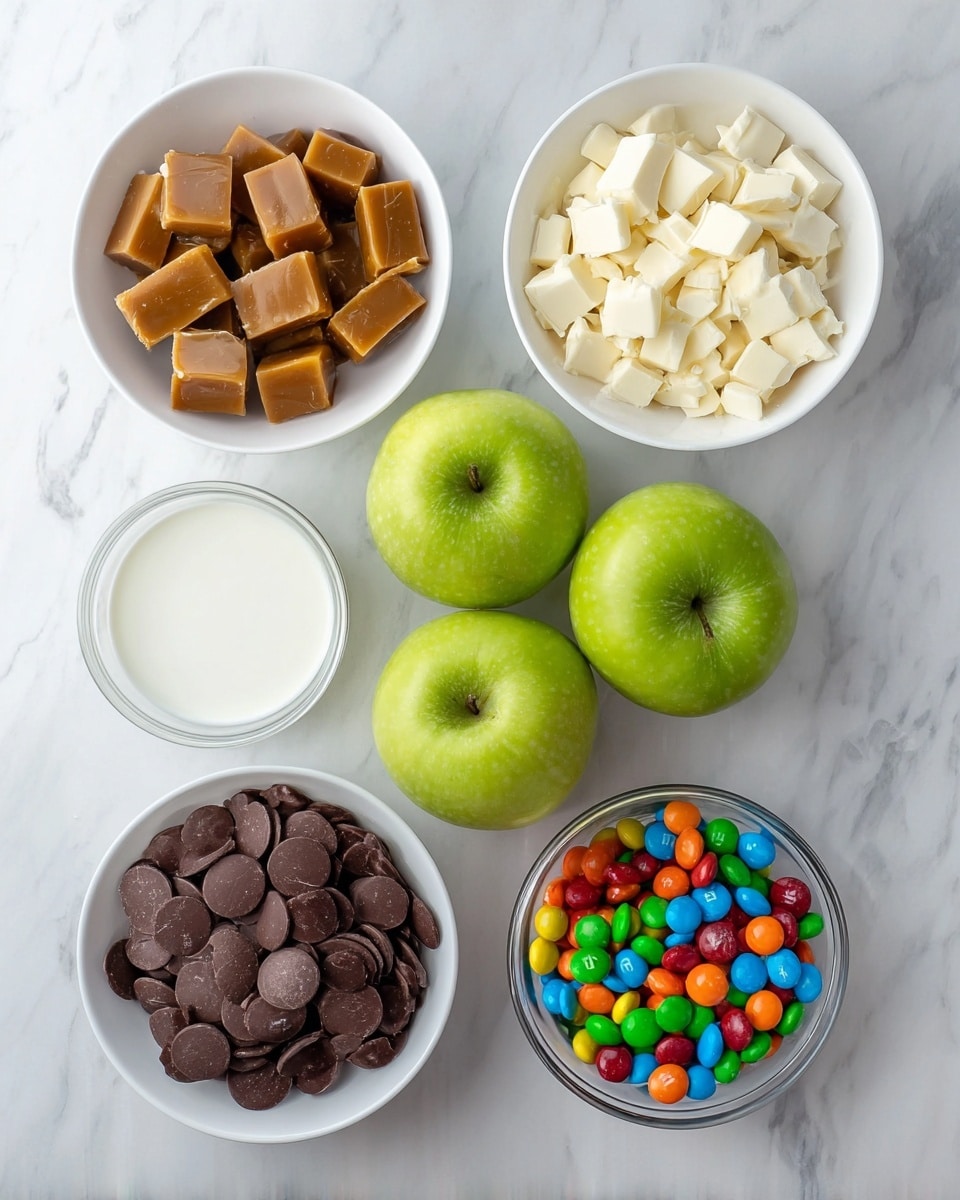
This recipe keeps it simple with a handful of essential ingredients that each add a distinct layer of flavor and texture. From the crispness of the apples to the creamy decadence of caramel and chocolate, every element contributes to making these apple slices irresistibly tasty.
- 3 large granny smith or honeycrisp apples: Choose fresh, firm apples for that perfect crunch and balance of tartness and sweetness.
- 10 ounces milk or dark chocolate melting wafers: High-quality chocolate makes the coating smooth, glossy, and wonderfully rich.
- 8 ounces soft caramel squares: These melt to a tender, buttery caramel that wraps the apple slices in comforting sweetness.
- 2 tablespoons heavy cream: Added to the caramel for a luscious, creamy consistency that drizzles beautifully.
- 1 cup complementary variety chocolate melting wafers (optional): Perfect for extra drizzled decoration and flavor contrast.
- Mini M&M’s, chopped nuts, or assorted small toppings: These provide a fun pop of texture and color, making each slice uniquely your own.
How to Make Chocolate Covered Caramel Apple Slices Recipe
Step 1: Prep Your Workstation
Start by lining a sheet pan with parchment paper or a silicone baking mat. This prevents sticking and makes cleanup a breeze. Having everything ready will keep the process smooth and enjoyable.
Step 2: Slice and Core the Apples
Carefully slice each apple into 4 or 5 thick slices, about half an inch wide. Removing the stem and core is key so that the slices are comfortable to eat and fit well on the popsicle sticks. Using a melon baller and a paring knife helps maintain a clean shape without poking all the way through.
Step 3: Insert Popsicle Sticks
Push a 10 mm-wide food-grade wooden popsicle stick halfway into the bottom of each apple slice. If the apple slice is too firm, a small slit cut with a paring knife will guide the stick in without cracking the fruit. This handle makes dipping and eating so much easier.
Step 4: Dip the Apple Slices in Chocolate
Melt your chocolate wafers gently using a double boiler or microwave, following the package’s instructions. Always pat the apple slices dry before dipping to help the chocolate adhere properly. Fully coat each slice just past the stick, letting excess chocolate drip off before placing them on your prepared sheet pan. Chill in the fridge for 5 to 10 minutes until the chocolate is set firm.
Step 5: Prepare the Caramel
While the chocolate firms up, melt your caramel squares with the heavy cream in short bursts in the microwave, stirring often until smooth and creamy. Set the caramel aside to cool slightly—it should be warm but not hot enough to melt the chocolate coating.
Step 6: Drizzle Caramel and Optional Chocolate
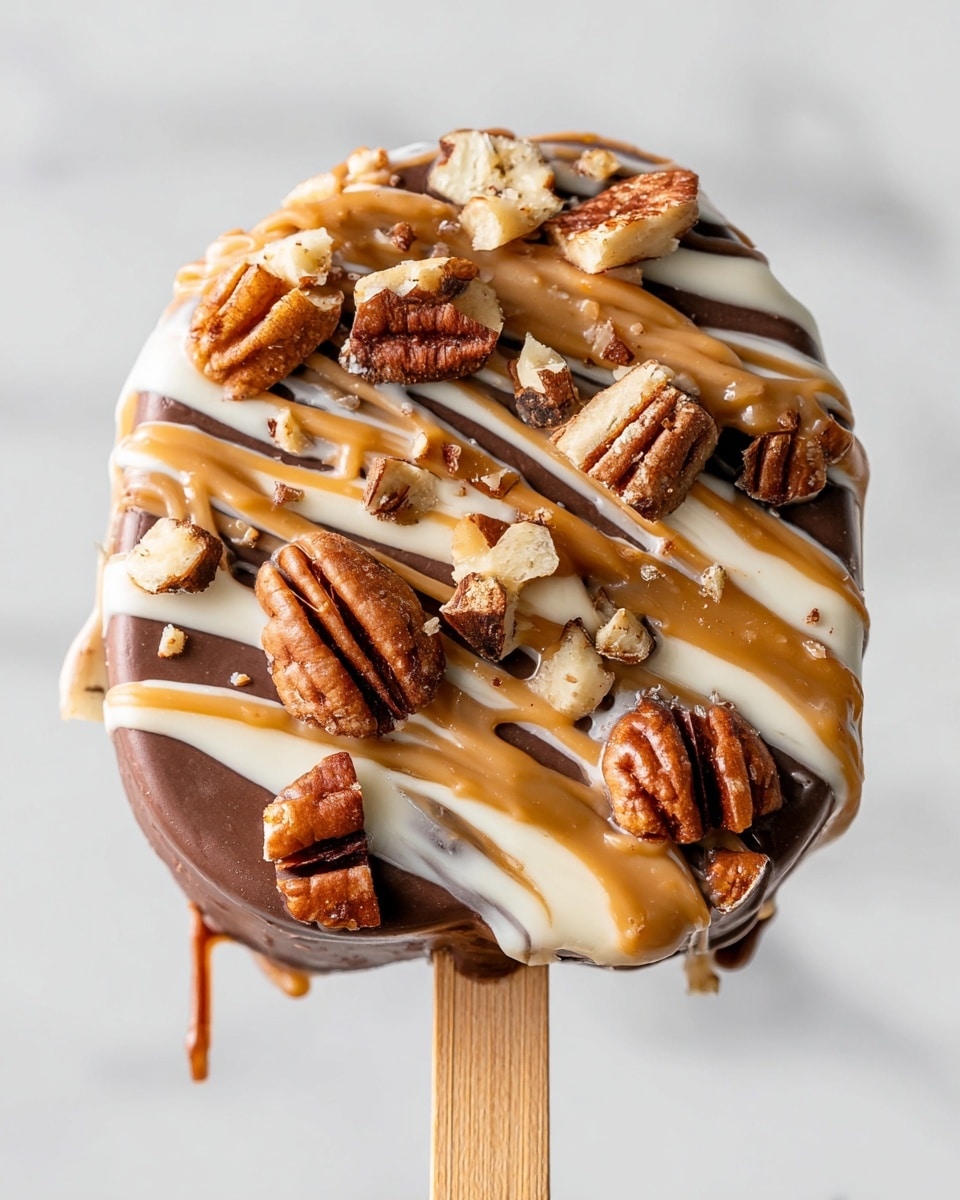
If you want to add extra flair, melt the optional chocolate wafers too. Using a spoon, drizzle the caramel over the chocolate-coated apple slices, then artistically drizzle the additional melted chocolate for contrast. Immediately sprinkle your chosen toppings so they stick nicely. Place the sheet back in the fridge and let everything set for another 10 to 15 minutes.
Step 7: Enjoy Your Beautiful Creations
Your Chocolate Covered Caramel Apple Slices Recipe is ready to wow! For best taste and texture, serve these delightful treats within a few hours of assembly. Refrigerate until you’re ready to indulge, but avoid leaving assembled slices overnight.
How to Serve Chocolate Covered Caramel Apple Slices Recipe
Garnishes
Adding garnishes like mini M&M’s, crushed nuts, or rainbow sprinkles not only enhances the look but also adds a delightful crunch and color pop. Try toasted coconut or sea salt flakes for a gourmet twist that complements the sweetness beautifully.
Side Dishes
This recipe shines as a standalone treat but can be perfectly paired with warm beverages like spiced cider or hot chocolate. For a fuller dessert spread, serve alongside vanilla ice cream or a light whipped cream to balance the rich chocolate and caramel.
Creative Ways to Present
Make your gathering extra special by arranging the slices on a decorative platter lined with autumn leaves or edible flowers. For parties, consider placing each slice in a mini cupcake liner for easy handling and a festive vibe. You can also stack them in a tiered display to impress your guests visually before they even taste these delicious bites.
Make Ahead and Storage
Storing Leftovers
Keep any leftover apple slices tightly covered in the refrigerator to maintain freshness. Because the apples can start to oxidize and the coatings soften, it’s best to enjoy them within 24 hours for the optimal crisp and chewy textures.
Freezing
Freezing is not recommended for this recipe, as the caramel and chocolate coatings can lose their texture and become grainy or sticky upon thawing. The apples themselves may also become soggy after freezing, so fresh enjoyment is definitely preferred.
Reheating
These treats are best enjoyed chilled or at room temperature. Reheating isn’t advised since heat can melt the chocolate and caramel, altering their texture and appearance. Instead, just take them out of the fridge a few minutes before serving to soften slightly.
FAQs
Can I use other types of apples?
Absolutely! While granny smith and honeycrisp are recommended for their balance of tartness and crunch, feel free to experiment with your favorite apples. Just keep in mind that sweeter apples might change the overall flavor balance.
What if I don’t have caramel squares?
You can substitute with homemade caramel sauce or store-bought caramel dip, but be sure it’s thick enough to drizzle without running too much. Soft caramel squares melt smoothly and offer consistent texture, making them ideal.
Can I make these nut-free?
Definitely! Simply skip any nut toppings and choose allergy-friendly options like mini M&M’s, sprinkles, or shredded coconut for added texture without the risk.
How do I prevent the apple slices from browning?
Patting the apple slices dry and assembling the treats quickly helps keep them fresh-looking. If desired, a quick soak in a lemon water bath before drying can reduce browning without affecting taste.
Is this recipe kid-friendly?
Yes, the colorful toppings and fun popsicle sticks make these treats a hit with kids. Just be mindful of allergies if serving with nuts or candy toppings, and supervise younger children while eating.
Final Thoughts
I can’t recommend this Chocolate Covered Caramel Apple Slices Recipe enough for bringing a little magic and sweetness into your day. It’s a delightful combo of textures and flavors that’s as playful as it is addictive. Once you try making these at home, you’ll wonder how you ever celebrated fall or any festive occasion without them. So grab your apples and get ready to create some seriously delicious smiles!
PrintChocolate Covered Caramel Apple Slices Recipe
Delightfully sweet and crunchy chocolate covered caramel apple slices, perfect for a fun and easy dessert or snack. Crisp apple slices are coated in rich melted chocolate, drizzled with creamy caramel, and topped with colorful mini M&Ms or chopped nuts for an irresistible treat that’s sure to impress.
- Prep Time: 20 minutes
- Cook Time: 20 minutes
- Total Time: 1 hour
- Yield: 12 servings
- Category: Dessert
- Method: No-Cook
- Cuisine: American
Ingredients
Apples
- 3 large granny smith or honeycrisp apples, washed and dried well
Chocolate Coating
- 10 ounces milk or dark chocolate melting wafers (such as Ghirardelli)
Caramel Topping
- 8 ounces soft caramel squares (1 cup), unwrapped (such as Kraft)
- 2 tablespoons heavy cream
Optional Drizzle and Toppings
- 1 cup complementary variety chocolate melting wafers (optional but recommended)
- Mini M&Ms, chopped nuts, and/or other assorted small toppings of your choosing
Instructions
- Prepare the Work Surface: Line a sheet pan with parchment paper or a silicone baking mat and set aside to ensure that the dipped apples won’t stick while setting.
- Slice the Apples: Cut each apple vertically from top to bottom into 4 or 5 slices about 1/2-inch thick (up to 3/4-inch thick if preferred). Use a melon baller and paring knife to remove the stem and carefully carve out seeds without piercing through the apple slice.
- Insert Popsicle Sticks: Place a 10 mm wide, food-grade wooden popsicle stick into the bottom center of each apple slice, pushing it halfway through. If necessary, create a small slit in the bottom of the apple slice with a knife to make insertion easier.
- Melt the Chocolate: Melt the milk or dark chocolate wafers using a double boiler or microwave per package instructions. Pat the apple slices dry thoroughly before dipping.
- Dip the Apples: Fully dip each apple slice into the melted chocolate up to just past where the stick meets the fruit. Allow excess chocolate to drip off before placing the slices in a single layer on the prepared sheet pan. Refrigerate for 5–10 minutes until the chocolate coating sets.
- Prepare the Caramel Sauce: Combine the unwrapped caramel squares and heavy cream in a microwave-safe bowl. Microwave in 20–30 second intervals stirring between each until the mixture is melted and smooth. Set aside to cool slightly.
- Melt Extra Chocolate (Optional): If using, melt the complementary chocolate wafers in the same manner and allow both caramel and extra chocolate to cool until warm but still fluid to avoid melting the chocolate coating on the apples.
- Drizzle and Top: Spoon the caramel sauce over the chocolate-dipped apple slices, then drizzle with the extra melted chocolate if using. Immediately sprinkle with mini M&Ms, chopped nuts, or your chosen toppings. Refrigerate an additional 10–15 minutes for the toppings and caramel to set.
- Serve and Store: For optimal flavor and texture, serve the chocolate covered caramel apple slices within a few hours of assembly. Keep refrigerated until ready to enjoy. Avoid making them the night before, as overnight storage before assembly can affect quality.
Notes
- Use firm apples like Granny Smith or Honeycrisp for the best texture and tartness.
- Make sure apple slices are completely dry before dipping in chocolate to ensure proper coating adherence.
- The popsicle sticks should be food-grade and about 10 mm wide for stability.
- Adjust thickness of apple slices between 1/2 to 3/4 inch based on preference; thicker slices may be harder to handle.
- If caramel or chocolate is too hot during drizzle, it can melt the base chocolate coat, so let them cool to a warm temperature.
- Store finished slices in the refrigerator and consume within the day for best taste and texture.
- Optional toppings add extra flavor and a fun presentation.


