Why You’ll Love This Recipe
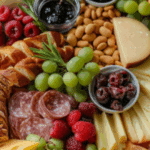
Building a cheese board is all about variety, and this brunch version is perfect for both kids and adults alike. The star of the board is the Tillamook Medium Cheddar Chunk—rich, flavorful, and sharp enough without being overwhelming for younger palates. The addition of fresh fruits, a selection of pastries, and a variety of spreads adds balance and excitement to the spread. Whether you’re hosting a brunch, a holiday gathering, or just a casual snack time, this cheese board makes it easy to please a crowd. Plus, it’s simple to assemble, especially if you prep the fruit the night before.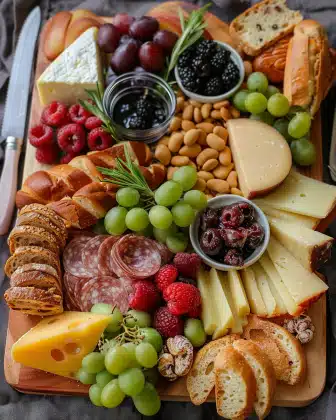
Ingredients
Cheese:
-
Tillamook Medium Cheddar Chunk (or any cheddar of your choice)
Fresh Fruits:
-
Strawberries
-
Blueberries
-
Blackberries
-
Kiwi
-
Red grapes
-
Green grapes
-
Sliced red apples
-
Sliced green apples
-
Sliced pears
-
Banana
Carbs & Pastries:
-
Granola
-
Mini croissants
-
Mini donuts
-
Specialty breads
-
Cereal
-
Mini pancakes
-
Mini waffles
Toppings & Spreads:
-
Butter (Tillamook Extra Creamy Butter is a favorite)
-
Jam
-
Syrup
-
Honey
-
Yogurt
(Tip: You’ll find the full list of ingredients and measurements in the recipe card below.)
Directions
-
Prepare Your Board: Start by choosing a large wooden board or a platter with enough space to arrange all your items. It’s best to have a bit of space between items to make it easy for guests to pick and choose their favorite snacks.
-
Arrange the Cheese: Slice the Tillamook Medium Cheddar Chunk on a diagonal to add visual interest to your presentation. Place the slices in one area of the board and add other cheeses if desired.
-
Add the Fresh Fruits: Slice your fruits into bite-sized pieces and arrange them around the cheese, filling in gaps. Choose fruits that offer a variety of colors and textures. For example, use red and green fruits for a festive holiday theme or mix in tropical fruits for a brighter look.
-
Place the Carbs & Pastries: Position mini croissants, donuts, granola, mini pancakes, and waffles in separate sections on the board. The variety of carbs provides a perfect base for the cheese, spreads, and fruit.
-
Add the Toppings & Spreads: Place small bowls for your spreads like butter, jam, syrup, honey, and yogurt. Position them where they are easy to access but won’t spill over the other items.
-
Mix It Up: The key to a beautiful cheese board is mixing colors and textures. The more varied the items, the more interesting and appealing it will look. Let your guests (or kids!) enjoy the buffet-style layout, making it easy to grab whatever they want.
-
Serve: Let the board sit at room temperature for a few minutes before serving so the cheese softens slightly for a creamier texture. Then, gather your friends and family, and enjoy the delicious variety of flavors!
Servings and Timing
-
Servings: 8-10 (depending on portion size)
-
Prep time: 30 minutes (mainly for fruit prep)
-
Total time: 30 minutes
Variations
-
Cheese Variety: Add more cheeses like brie, goat cheese, or gouda to offer a variety of textures and flavors.
-
Fruit Options: In addition to the fruits listed, you could add pomegranate seeds, figs, or dried fruits like apricots and raisins for an even more varied and colorful display.
-
Nuts: Add roasted nuts such as almonds, walnuts, or cashews to bring some crunch and extra flavor to the board.
Storage/Reheating
-
Storage: If you have leftovers, store the cheese in an airtight container in the fridge for up to 3-4 days. Fruits can be stored separately in a sealed container but should ideally be eaten within 1-2 days for maximum freshness.
-
Reheating: There’s no need to reheat the cheese board; just serve at room temperature.
FAQs
Can I use a different cheese besides Tillamook Cheddar?
Yes, you can use any cheese you prefer. Some good alternatives include sharp cheddar, gouda, or even brie for a creamy addition.
How do I make this more kid-friendly?
To make this cheese board more appealing to kids, consider using more mild cheeses, cut the fruits into fun shapes, and opt for sweeter spreads like honey or fruit jams.
Can I prepare the cheese board in advance?
Yes! You can prep the fruits and slice the cheese ahead of time. Just cover the board with plastic wrap and refrigerate until you’re ready to serve. Add the fresh fruit right before serving to keep it looking fresh.
What other toppings can I include?
You can add olives, pickles, or spreads like hummus, mustard, or tapenade for extra variety.
Can I use store-bought pastries?
Absolutely! If you’re short on time, store-bought mini croissants, mini waffles, or donuts will still make the board look and taste delicious.
Can I serve this board as a main meal?
Yes, this cheese board can easily be the centerpiece of a light brunch or lunch, especially with the addition of hearty breads, nuts, and enough protein-rich cheese.
How do I keep the cheese from getting too soft?
If you’re making the cheese board in advance, keep the cheese in the fridge until just before serving to prevent it from becoming too soft.
How can I keep the fruit fresh on the board?
To prevent fruit from browning, try tossing apples and pears with a little lemon juice before placing them on the board. For longer-lasting freshness, add fruits just before serving.
What kind of drinks go well with this cheese board?
Pair this cheese board with a light white wine, sparkling water, or a refreshing fruit punch to complement the variety of flavors.
How do I make the board visually appealing?
Use a variety of colors and textures, and arrange items in a way that allows guests to easily pick and choose. Don’t be afraid to let things spill over a little—it makes for a more rustic, welcoming look.
Conclusion
A brunch cheese board is an effortless way to impress guests while offering a wide range of delicious, customizable options. With the perfect balance of cheese, fresh fruit, pastries, and spreads, this cheese board is sure to be a hit at your next brunch or gathering. It’s not only visually stunning, but it also offers a variety of flavors and textures that everyone can enjoy
Print7 Minute Brunch Cheese Board
A brunch cheese board featuring Tillamook Medium Cheddar Chunk, fresh fruits, carbs, pastries, and spreads, creating an elegant and fun spread perfect for any gathering. It’s simple to assemble and offers a variety of flavors and textures to please both kids and adults.
- Prep Time: 30 minutes
- Cook Time: 0 minutes
- Total Time: 30 minutes
- Yield: 8-10 servings
- Category: Appetizer
- Method: Assembling
- Cuisine: Fusion
- Diet: Vegetarian
Ingredients
Cheese:
Tillamook Medium Cheddar Chunk (or any cheddar of your choice)
Fresh Fruits:
Strawberries
Blueberries
Blackberries
Kiwi
Red grapes
Green grapes
Sliced red apples
Sliced green apples
Sliced pears
Banana
Carbs & Pastries:
Granola
Mini croissants
Mini donuts
Specialty breads
Cereal
Mini pancakes
Mini waffles
Toppings & Spreads:
Butter (Tillamook Extra Creamy Butter is a favorite)
Jam
Syrup
Honey
Yogurt
Instructions
- Prepare Your Board: Choose a large wooden board or platter with enough space to arrange all your items, leaving space between items for easy picking.
- Arrange the Cheese: Slice the Tillamook Medium Cheddar Chunk on a diagonal for visual appeal. Place it in one area of the board and add other cheeses if desired.
- Add the Fresh Fruits: Slice fruits into bite-sized pieces and arrange them around the cheese, ensuring a variety of colors and textures for a festive look.
- Place the Carbs & Pastries: Position mini croissants, donuts, granola, mini pancakes, and waffles in separate sections, offering a variety of carbs for guests to enjoy with cheese and spreads.
- Add the Toppings & Spreads: Place small bowls for butter, jam, syrup, honey, and yogurt in accessible spots without spilling onto other items.
- Mix It Up: The key to an appealing cheese board is variety. Arrange items in a way that showcases different colors and textures.
- Serve: Let the board sit at room temperature for a few minutes before serving so the cheese softens slightly. Gather your guests and enjoy!
Notes
- Cheese Variety: Add cheeses like brie, goat cheese, or gouda to offer different flavors and textures.
- Fruit Options: Add pomegranate seeds, figs, or dried fruits like apricots for more variety.
- Nuts: Include roasted nuts like almonds, walnuts, or cashews for crunch and extra flavor.
- Storage: Store leftovers in airtight containers in the fridge for up to 3-4 days. Keep fruits stored separately and consume within 1-2 days for freshness.
- Reheating: There’s no need to reheat the board, just serve at room temperature.
- Kid-Friendly: For kids, consider using more mild cheeses and fun-shaped fruits and sweeter spreads.
Nutrition
- Serving Size: 1 serving
- Calories: 300
- Sugar: 15g
- Sodium: 250mg
- Fat: 20g
- Saturated Fat: 8g
- Unsaturated Fat: 10g
- Trans Fat: 0g
- Carbohydrates: 25g
- Fiber: 5g
- Protein: 8g
- Cholesterol: 25mg
